Staying Focused With Microsoft Outlook: Email
with 13 comments
 Time to get tactical; too many posts recently haven’t been! This post is focused on Microsoft Outlook 2003 and 2007.
Since 1997, Microsoft Outlook has been my email program of choice. Sure I’ve dabbled with web mail like Hotmail and Gmail for my personal account, but for anything “serious” I always come back to Outlook. Of course it doesn’t hurt that I work for Microsoft and therefore couldn’t escape Outlook if I tried, but I continually find Outlook to be an absolute gem for email and for productivity in general.
Part of this is due to the fact that email, calendar, notes, to-do items, a corporate directory, and umpteen other important “modules” are available in a single application. Another big factor is comfort of course – 12 years in a single program means there isn’t much I don’t know about it at this point. But for all intents and purposes, I love using Outlook and always have.
This post is about dealing with email overload in Outlook. It assumes you’re likely in a corporate environment with Microsoft Exchange and that you know a thing or two about Outlook already. It also assumes email has a chokehold on your life, and you want to learn how to escape with your sanity.
The principles and techniques in this post are things I’ve learned and used over the years and have taught to hundreds of others at Microsoft through “brown bags”, 1:1 coaching, and seminars. Special thanks go out to Omar Shahine, Michael Affronti, and Trevin Chow for lots of brainstorms and conversations about Outlook email – much of this comes from them. Omar’s actually my partner in crime as we’ve given talks on Outlook together a few times.
Before getting into the nitty gritty, let’s start with 7 basic email principles which aren’t specific to Outlook use:
- Reserve your inbox for important items. Any distribution lists or other types of email you receive that are just of the “FYI” variety (shopping receipts, Netflix shipping reminders, Facebook notifications, etc.) should be filtered away from your attention automatically.
- Deleting and archiving email should be a one-step (or one-click) action. Delete without prejudice and archive anything you think you’ll need to refer to at some point, but don’t worry about having deep, nested folders.
- Never read an email twice. When processing your email, every time you open a message use the 4Ds discussed as part of David Allen’s Getting Things Done. Delete it immediately, Do it immediately, Delegate (or forward) it, or Defer it by converting it to a task or appointment.
- Emails that need follow-up (either by you or by others) should be converted to Tasks or Appointments. Convert an email to a task with a due date if you want to do it on that date, and convert it to an appointment if it’s time-based (i.e. pick someone up from the airport). If it’s mandatory that something get done on a certain day but it doesn’t matter what time it’s done, I usually book time for myself on my calendar anyway just to make sure it happens that day.
- Tasks should be broken down into two important categories: “Next Actions for you” and “Waiting on from others”. While there are other categories and lists you can use in Outlook, these are the two most critical.
- Bounce your inbox at zero as often as you can – ideally a few times per week. This means “seeing the white” in your inbox and knowing 100% of your email has been processed. See Bouncing at Zero for more information about this.
- Bounce your daily task list at zero everyday. Your entire task list will never be empty, but every single day you should know what you’ve accomplished and rebalanced your items for the future (i.e. don’t just ignore them!) Again, bounce at zero!
There are a dozen more principles I could list, but I want to keep this post a) short and b) more about making things happen than about platitudes. As Bruce Lee said, “Knowing is not enough, we must apply”.
Now that the high-level principles are out of the way, let’s talk about how best to setup Outlook for massive focus.
Declare Email Bankruptcy and Start Over
If your Inbox currently has more than 100 messages you don’t think you’ll have time to get to, you have a hard choice to make. You can either a) set some time aside to get through each and every message individually using the 4Ds described above, or you could b) just declare bankruptcy by archiving all your messages and starting fresh. Choose one now.
If it’s important, they’ll seek you out again. You can either live underneath a mountain of guilt and shame or you can take an important first step in getting a grip on your email. I vote to start fresh.
Turn Off All Notifications
Before going any further, if you really care about focusing on what’s important, you should turn off the notifications Outlook generates that are guaranteed to drop you out of flow. There’s nothing worse than being in the middle of writing an important document when an alert that a family member has forwarded a chain letter from 1996 pops up. To turn off all notifications, go to: Tools->Options->Email Options->Advanced Email Options… and uncheck any of the options in red you’d like to turn off.

View By Conversation and Color-code Items
If you receive a lot of email that goes back and forth between people (like I do) then turning on conversation view is the next thing you should do. “View by conversation” will group all messages in a conversation together so you can easily delete, archive, and find the latest message in a long thread easily.
It will probably take you at least a week to get used to this new view. It’s pretty different, but the time spent is worth it. You’ll find yourself to be a lot more productive once you get over the hump. One thing I like to do in a thread of more than a few messages is to quickly delete all the messages leading up to the last one – and then I just read/archive/respond to or delete the last message. That alone can cut a 100 item inbox down to 30 or 40 items pretty quickly.
To turn on this view, just go to View->Arrange By->Conversation:

Once you have conversations setup, another good thing to do is to color code messages sent directly to you. I use maroon but you can use blue, green, or any other color. To do this, you have to setup automatic formatting:
- Go to View->Current View->Customize Current View
- Click Automatic Formatting…
- Click Add and call the rule “To Me”
- Click Font and select the style you’d like to use
- Click Condition and then select “Where I am on the To line with other people”
Once you have this setup, you could do the same thing with a different color for the CC line. This one trick will help you if you only have 10 minutes to catch-up, but you have 50+ emails waiting to be processed. You can quickly see which ones are important (!) or just the ones sent directly to you.
Set up Rules
If you receive email you don’t need to see right away, you’re a prime candidate for rules (or filters). In general, I would setup a rule for email if you’re 95% certain there isn’t going to be any email caught by the rule you’d need to see immediately. Setting up rules is quite easy in Outlook and it’s powerful enough so that you can do things like “send this message to a special folder unless I’m on the To or CC line”.
To setup a rule, find a type of email you’d like to filter out of your Inbox permanently, right-click on the email and select “Create a rule”:
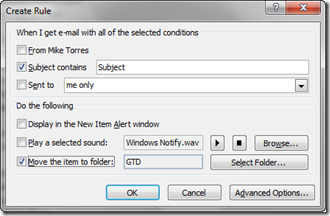
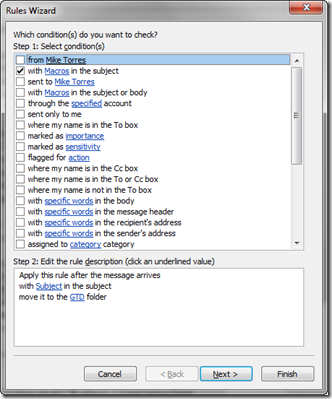
From here you can automatically filter email from specific people, with a specific subject, or sent to specific people. If you want to get more advanced, you can click “Advanced Options…” and enter the Rules Wizard which gives you all sorts of great and easy to use options:
Every single time you find yourself reading an email in your Inbox that you don’t feel should have ended up there, setup a rule and get it – and all future emails like it – as far away from your Inbox as possible. Of course, if you’re at all interested in the content, you should check-in on these folders from time to time as part of your overall workflow.
Simplify Your Folder Hierarchy
Merlin Mann’s Inbox Zero (which is fantastic!) has forced thousands of people to reevaluate their email archiving strategy. Instead of having 50 different folders for filing, Merlin recommends having just one folder called “Archive” or “Everything” and filing items there. Once they’re in a single folder, you can use Outlook search to find anything you need in less than a second (more on this in a bit). This will cut down significantly on the cognitive overhead each and every time you receive an email.
Once you’ve created this folder and removed all the other cruft from your mailbox, you can start to make use of keyboard shortcuts for referencing your archive and for archiving email. These two keyboard shortcuts are invaluable when viewing messages:
- CTRL-SHIFT-V. Use this to file email in your Archive folder. It will remember the last used folder, so your workflow will become almost automatic (CTRL-SHIFT-V, Enter, CTRL-SHIFT-V, Enter, etc.)
- CTRL-SHIFT-Y. Use this to jump to your Archive folder or back to your Inbox.
If you’re not a keyboard fan, you have another simple option. Look in the toolbar for this button which will make it even quicker to archive items:
![]()
Use Search Shortcuts
Instant Search in Outlook 2007 is a life-saver, especially if you’ve simplified your folder hierarchy by going to a single Archive folder. You can search any folder just by typing in the search box below the Inbox header. Here are just a few examples of how search can work for you:
- Search for “bobby” to find any emails containing Bobby.
- Search for from:"bobby moore" to find any emails sent from Bobby Moore.
- Search for from:"bobby moore" about:”status report” to find any emails from Bobby Moore where the words status report appear in the subject, body, or attachment contents (cool!)
- Search for subject:status to find any emails where status appears in the subject
- Search for subject:status received:May to find any emails where subject contains status and the message was sent in the month of May of any year
You can read the rest of the search query syntax on Microsoft’s Outlook site. I’d recommend printing it out and having it handy as you get used to it.
You can do a lot using the search form too. Learn more on Microsoft’s Outlook site.
Simplify Your Default View
Another benefit of reducing the number of folders you have is that you can get a lot more space back to see your email list and the contents in the reading pane – because you no longer have to view all of your folders, all of the time! To do this, minimize your navigation pane by clicking the minimize button in red:
![]()
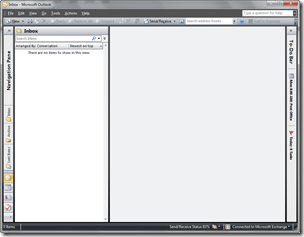
This is what your Inbox looks like before minimizing the navigation pane:
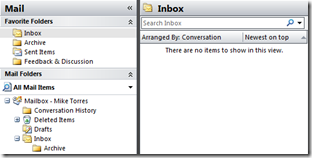
This is how your Inbox will look after
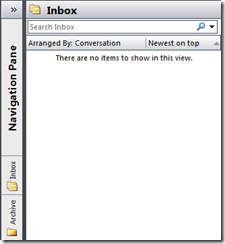
Lots of space saved! Once the navigation pane is minimized, you can add your Archive folder (or any others you want) to the minimized navigation pane for quick mouse access – you can see this in the screenshot above. You can do this by right-clicking on a folder in the expanded folder list and then clicking “Add to Favorite Folders”.
Create Buttons for Next Actions and Waiting For Tasks
This is a little more complicated than some of the previous recommendations, but it’s worth doing. It won’t take more than a couple minutes to do if you follow the instructions. Note that there are other ways to do this using Flags in Outlook, but I don’t recommend it – it’s far nicer to use Macros because they create “real tasks” in Outlook, complete with subjects and mobile device synchronization. And they force you to look at the subject + due date during the flow.
These macros will:
- Take one or more email(s) and attach them to a task
- Automatically file the email(s) in your Archive folder
- Set the due-date to tomorrow (including jumping over the weekend if it’s a Friday – thanks Trevin!)
- Set a reminder for the task
- Pop-up the new task immediately so you can modify it before saving
Here’s what you need to do to enable this – don’t worry, it will just take a minute:
- Start Outlook
- Go to Tools–>Macros–>Security and make sure macros aren’t disabled
- Go to Tools–>Macros->Visual Basic Editor and double-click on This Outlook Session on the left (if it’s not visible, you need to expand the tree) which will open the code window on the right
- While in the code window, copy and paste the macros from this page and replace YOUR NAME with your actual name.
- Close the window and restart Outlook, opting to Save when prompted
Now that your macros are ready to go, you just need to add buttons and keyboard shortcuts.
- Start Outlook
- Go to View–>Toolbars–>Customize
- On the Commands tab, click Macros on the left-hand side
- Drag the Next Action macro to the toolbar (I like it next to the “Send/Receive“ button)
- Right-click on the button and change the Name field to “&1-Next Action” and the button image to something catchy
- Follow steps #4 and #5 for the Waiting For macro also (and call it “&2-Waiting For”)
- Click Close
What you’ll have:
![]()
What to do now:
When you come across an email with an action for you, click “Next Action” to create a task with a subject, due date, and the email attachment. Type a VERY clear task name – i.e. “Talk to Rob about something important” so you don’t have to think too much when that day arrives. You can also use ALT-1.
When you come across an email with an action for someone else, click “Waiting For” to create a task with the person’s name, due date, and the email attachment again. You can also use ALT-2. This is sometimes best used from the Sent Items folder since you’re probably tracking something you’ve sent to someone else.
One fun trick: you can use natural language in the date field. So instead of using the mouse and finding a date, you can type “tomorrow”, “2 weeks”, “today+4 days”, or “a week from Monday”. Lots of things work that you wouldn’t expect – it’s cool!
Give It a Try!
Hope this has been helpful! Be on the lookout for more Outlook tricks and tips over time!